Dreamcatcher was used by American indigenous to ward off nightmares. It was donated to the birth of each child, who kept all his life, decorating it as he saw fit.
It is composed of an outer circle flexible wood (eg willow), which represents the cycle of life and the universe, a weft to "catch" the dreams and direct them, a string of beads symbolizing the nature and the feathers of birds to remove nightmares.

What you'll need:
21cm rattan hoop
8cm rattan or metal craft ring
Craft feathers (you’ll need seven large feathers and about 20 small ones)
Wooden beads in varying sizes – we used beads 7mm (a quarter inch) to 2cm (three quarters of an inch) in diameter
8 skeins of Perle 5 thread in complementary hues
Scissors
Craft glue

How to do it:
Cover the hoop
Start by laying the end of the thread along the hoop and holding it with your thumb. Then wind the thread around and around the hoop, wrapping over and covering the tail. Continue winding the thread around the hoop until you’ve covered at least a third of the hoop.


To change colours, simply lay the end of the new thread along the hoop and hold it in place while you wrap over it.
To finish the first colour, lay the end of the thread along the hoop and begin to wrap the second colour over it.
Continue to change colours to create a pattern around the hoop. Use the same technique to cover the smaller ring.


Join the hoop to the ring. Place the ring inside the hoop and wind the tail from the ring up and around the hoop and back around the ring. Then wind it back around the hoop and tie a double knot close to the hoop.


Now using the tail from the hoop, begin to join the hoop and the ring together, winding in a figure 8. Continue all the way around the hoop.

When you are happy with the way it’s looking and there are no big holes, tie the thread in a double knot around the hoop and trim off the tail.


Add the fringe. Tie one length of thread on at a time starting with the colour that will be in the centre. Fold the thread in half and pass it under the bottom of the hoop. Bring the folded end up through the hoop and pass the tails through the folded end.
Pull the knot tight so it’s at the bottom of the hoop and the thread hangs down.
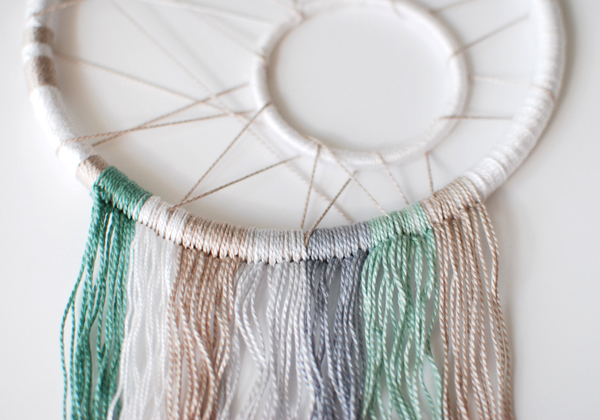
Add each additional colour to the left of the centre. Make sure you keep the threads as parallel and untangled as you can.
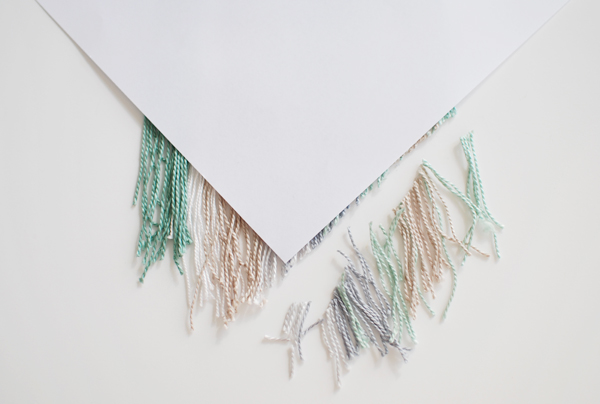
Trim he fringe. Take a piece of office paper and fold one corner over to meet the opposite edge, forming a triangle. Cut along the folded line.
Lay the dreamcatcher on your work surface and comb the fringe with your fingers so it’s laying straight. Place the triangle on top of the fringe to use as a cutting guide.
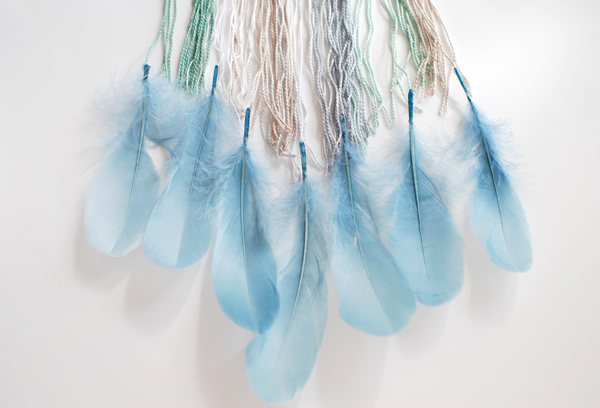
Arrange the large feathers according to size, with the longest one in the centre to the smallest on the outside. Find the thread that is roughly in the centre of the centre colour. Run some glue along the top of the feather and attach the thread to it.
Feathers, thread and glue are a tricky mix, so be careful to use the glue sparingly and keep a damp cloth close by to wipe your fingers. Keep the glue away from the fringe or things could quickly go pear shaped!

Place a small amount of glue on the top of a feather and thread a bead onto it, making sure you leave at least a centimetre (half an inch) of the feather showing at the top. Repeat for all the feathers, keeping them grouped according to size.
Starting with the larger feathers, attach them to the fringe so they are evenly spaced out.
Progressively add the rest of the small feathers to the fringe. To avoid a gluey, feathery mess, pull individual threads out to the side before you glue the feathers on.


Cut a length of thread about 26cm (10 inches) long, fold it in half and tie a knot in the end.
Thread the folded end through a large bead. Pass the folded end under the top of the dreamcatcher hoop. Bring the folded end up and pass the bead and thread through it. Pull the knot tight.
Ok! Now have good dreams. Let us know how is you dreamcatcher .
Tutorial of Lisa Tilse
Tutorial of Lisa Tilse


0 comentários :
Postar um comentário